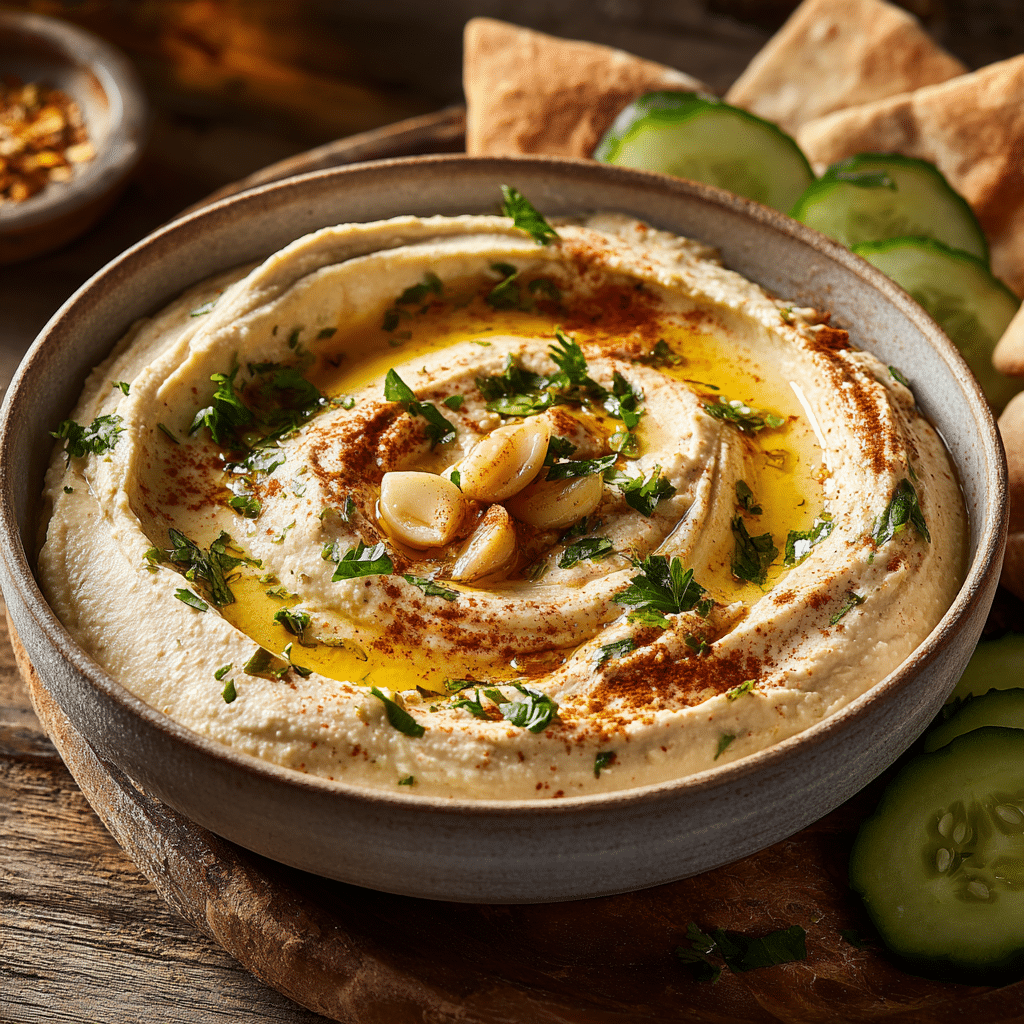
There’s something deeply comforting about dipping a warm piece of pita bread into creamy homemade hummus. And if you’re anything like me, adding roasted garlic takes this classic spread to a whole new level. It’s nutty, mellow, and rich without being overpowering—just the way I like it.
In this recipe, I’ll show you how to make a velvety roasted garlic hummus from scratch using canned chickpeas and a few pantry staples. I’ll also explain how to get that smooth, creamy texture you usually only find in store-bought versions—without using any preservatives.
What Is Roasted Garlic Hummus?
Let me break it down for you:
- Roasted Garlic: When garlic is roasted, it becomes soft, caramelized, and slightly sweet, losing its raw sharpness. Perfect for blending.
- Hummus: A Middle Eastern dip made from mashed chickpeas, tahini (sesame paste), lemon juice, garlic, and olive oil.
- Roasted Garlic Hummus: A blend of the two. Think of it as the elevated version of traditional hummus—with layers of savory depth.
It’s great as a dip, spread, or even as part of a veggie-packed grain bowl.
Why You’ll Love This Recipe
- Full of flavor: Roasting the garlic softens its bite and gives it a richer, slightly sweet depth.
- Creamy and smooth: I use a trick with warm water to help blend the hummus until it’s ultra-creamy.
- Easy to make: All you need is a food processor and a handful of everyday ingredients.
- Customizable: Make it spicy, leave out the tahini, or use it as a base for other flavor combos.
Ingredients You’ll Need
Here’s everything I use to make this roasted garlic hummus recipe:
For the Hummus:
- 1 large head of garlic (about 10–12 cloves)
- 1 tablespoon olive oil (for roasting)
- 1 can (15 oz) chickpeas, drained and rinsed
- ¼ cup tahini (stirred well)
- Juice of 1 large lemon (about 3 tablespoons)
- ½ teaspoon ground cumin
- ¼ teaspoon salt (adjust to taste)
- 3–4 tablespoons ice-cold water (or more for smoother texture)
- 2 tablespoons extra virgin olive oil (for blending and drizzling)
- Optional: pinch of smoked paprika or cayenne for garnish
Optional Toppings:
- Olive oil drizzle
- Chopped parsley
- Roasted chickpeas
- Sesame seeds or za’atar
- Extra roasted garlic cloves
How to Roast Garlic (The Easy Way)
Roasting garlic is easier than you think. Here’s what I do:
- Preheat oven to 400°F (200°C).
- Slice off the top ¼ inch of a whole garlic head to expose the tops of the cloves.
- Place it on a piece of foil, drizzle with 1 tablespoon of olive oil, and wrap it up.
- Roast for 35–40 minutes until the cloves are golden brown and tender.
- Let cool slightly, then squeeze out the soft garlic cloves into a small bowl.
That’s it. Now your garlic is sweet, mellow, and ready to blend.
Pro Tip:
If you’re short on time, you can roast peeled garlic cloves in a pan with olive oil over low heat for about 15–20 minutes, stirring occasionally, until golden and soft. It won’t be exactly the same, but it works.
How I Make Roasted Garlic Hummus at Home
Once that garlic is roasted and golden, the rest is easy. I like to keep things simple, and this recipe is exactly that—just toss everything into a food processor and let it do the work.
Step-by-Step (This Is How I Do It)
- Add the chickpeas and roasted garlic
I start by tossing the chickpeas and all those soft, caramelized garlic cloves into the food processor. That smell? So good. - Throw in the tahini, lemon juice, cumin, and salt
This is where the flavor starts to build. I usually eyeball the lemon juice depending on how zesty I want it. - Pulse it a few times
Give it a few quick blends just to break things up. - Drizzle in cold water and olive oil while blending
Here’s the trick: cold water = creamy hummus. I pour it in slowly while the machine runs. Same with the olive oil—it adds that velvety finish. - Taste and tweak
I always dip a spoon in at this point. Need more lemon? Add it. Want it silkier? A splash more water does the job. - Blend until super smooth
Don’t be afraid to blend a bit longer than you think. The smoother, the better. - Spoon it into a bowl and dress it up
I swirl the top with a spoon, drizzle some extra olive oil, and maybe toss on some smoked paprika or pine nuts. Whatever I have on hand.
A Few Personal Tips
- Cold water really matters – I don’t skip it. It gives the hummus that soft, fluffy texture.
- Want it ultra-smooth? – If I’m not in a rush, I’ll peel the chickpeas. Yes, it takes a few minutes, but the result is crazy smooth.
- Don’t overthink it – This recipe’s hard to mess up. Just taste as you go and make it how you like.
How to Store It (And How Long It Lasts)
Roasted garlic hummus is one of those things I always make a bit extra of—it stores beautifully and somehow tastes even better the next day.
Here’s how I store mine:
- Fridge: I scoop it into an airtight container and keep it in the fridge. It stays fresh for about 5–7 days. Just give it a stir before serving.
- Freezer: Yep, it freezes. I portion it into small containers so I can thaw just what I need. It lasts about 2–3 months frozen. When thawing, I let it sit in the fridge overnight, then give it a quick stir or re-blend with a touch of water or oil.
How to Serve Roasted Garlic Hummus
I could honestly eat this hummus straight from the bowl—but it’s also super versatile. Here’s how I love serving it:
My favorite ways:
- As a dip: With pita chips, cucumber slices, cherry tomatoes, or carrot sticks.
- In a wrap: Spread it inside a warm tortilla with some grilled veggies or falafel.
- As a toast topper: On crusty bread with avocado or sliced radish.
- With grain bowls: A dollop on top of quinoa, roasted veggies, and greens makes any bowl better.
- On a mezze platter: Paired with olives, pickles, and flatbread—it’s perfect for sharing.
Nutrition Info (Per Serving)
| Nutrient | Approx. Amount |
|---|---|
| Calories | 150–170 kcal |
| Protein | 4–5g |
| Carbohydrates | 14–16g |
| Fiber | 3–4g |
| Fat | 10–12g |
| Saturated Fat | 1–1.5g |
| Sodium | 100–150mg |
This is based on a standard serving of about 1/4 cup. It’s healthy, filling, and fits great into plant-based diets.
Final Thoughts
Roasted garlic hummus has totally earned its spot in my fridge. It’s creamy, rich, and way more flavorful than anything you’ll pick up at the store. Once I learned how easy it was to roast garlic and blend up a batch, I stopped buying the pre-made stuff altogether.
What I love most is how flexible this recipe is. You can leave out tahini, go extra heavy on the garlic, or even add things like paprika or roasted peppers if you’re in the mood to change it up. It’s perfect with fresh veggies, warm pita, or spread inside wraps and sandwiches.
Seriously—once you make this just once, I promise you’ll be hooked.
Roasted Garlic Hummus
Ingredients
Method
- Cut the top off a whole garlic head, drizzle with olive oil, wrap in foil, and roast at 400°F (200°C) for 40 minutes. Let it cool.
- Drain and rinse the chickpeas. Optional: peel the skins for extra smooth texture.
- Once cooled, gently squeeze the roasted garlic cloves out of the skin.
- In a food processor, add roasted garlic, chickpeas, tahini, lemon juice, olive oil, and salt. Blend until mostly smooth.
- Add cold water a tablespoon at a time while blending until creamy and smooth. Taste and adjust salt or lemon if needed.
- Scoop into a bowl, drizzle with olive oil, and sprinkle with optional toppings like paprika, pine nuts, or fresh parsley.
Notes
- You can skip tahini if needed — it’ll still taste great.
- If you want an extra-smooth texture, peel your chickpeas before blending.
- Leftovers can be stored in the fridge for up to 5–7 days in a sealed container.
- Try adding a bit of smoked paprika or roasted red pepper if you want to mix things up.
FAQ
Can I make roasted garlic hummus without tahini?
Yes, absolutely. If you’re out of tahini or just not a fan, you can skip it entirely. The hummus will still be creamy thanks to the chickpeas and olive oil. Some people like to replace tahini with plain Greek yogurt or even a little nut butter for a different twist.
Can I use dry chickpeas instead of canned?
Yes! Just soak them overnight and cook until soft (usually around 1.5 hours). About 1½ cups of cooked chickpeas equals one standard 15 oz can. Using dried chickpeas can make the hummus even smoother if you blend them while they’re still warm.
How do I get my hummus extra smooth?
A couple of tricks help: peel the chickpeas (yes, a little tedious, but worth it), and use ice-cold water while blending. You can also blend the garlic and lemon juice first, then add the chickpeas gradually for a creamier consistency.
Is roasted garlic hummus vegan?
It is! All the main ingredients—chickpeas, garlic, lemon juice, tahini, and olive oil—are plant-based. Just be sure any add-ins, like yogurt or store-bought toppings, are vegan if that matters to you.
How long will homemade hummus last in the fridge?
Stored in an airtight container, it’ll stay fresh for about 5 to 7 days. Give it a stir before serving and taste to make sure it’s still good. You might also want to drizzle a little olive oil over the top to keep it from drying out.
Can I freeze roasted garlic hummus?
Yes, and it freezes surprisingly well. Just portion it out into small containers and freeze for up to 3 months. When you’re ready to eat, let it thaw in the fridge overnight. Give it a good stir or a quick blend to bring back the creamy texture.